Category Archives: House projects

Weekend project

This weekend, I tore a hole in my porch ceiling to replace a couple broken beadboard planks. After searching for beadboard of the right size and pattern, I finally found some pressboard planks at Home Depot a few weeks back. I had brought the package inside and left it wrapped in plastic to protect it from dust and the cat.

After demolishing the bad planks (which Don did happily with his Cubs hammer and a grin of destruction on his face), I unwrapped the new boards to read the installation instructions – and discovered they’re suppo
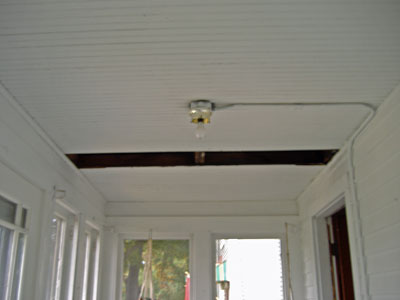
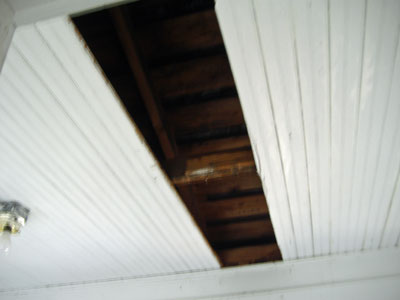
sed to cure for 72 hours in the “climate of the room” before hanging. I wondered if it really mattered, since the porch isn’t really insulated and goes through a variety of temperatures and humidities in a year, but decided to be safe rather than sorry, so now I’ve got a hole in the ceiling for the next couple days. Next time, I’ll read the related information well before I plan to start the project.

Upcoming Projects

I spent part of Saturday planning out my projects for the next six months, along with budget and a bit of Dad guidance. Here’s my tentative plan for the next few months:

1) Fence. Must do this soon, before the ground hardens. I’ve done quite a bit of research (including the need for a permit!), taken tons of measurements, and am just about ready to go. Except, of course, for a few nagging questions. Like, what do I do with the old fence? And what happens to all the junk my neighbor has propped up against my back fence? Those will be answered soon.

2) Windows. I’ve been window shopping lately, learning as much as I can about replacement windows. I spent a couple good hours at Home Depot learning from their window expert and have read countless websites. In the interest of time, sanity and proper insulation, I will be hiring a company to do this project – their estimates will determine how many I replace now versus next year. I’ve got three contractors identified for bids; I hope to have them all out within the next few days.

3) Replace cracked window panes. Related to replacing windows, I’ve got two cracked panes on my porch. Replacing them will take a bit of research, but I should be able to handle it myself.

4) Finish caulking the porch roof. I started this with half a tube of leftover caulk, so I might as well finish it. A little extra insulation never hurt anyone.

5) Light-a-palooza. I have a couple u-g-l-y light fixtures that continue to annoy me. The next time that Home Depot/Lowe’s/Menards has a great lighting sale, I’m going to bite the bullet and replace a couple of the most egregious – like the Hollywood Barbie light bar in the downstairs bathroom and the naked bulb in the stairwell.

6) Dining room floor. My floor has been uneven since I first looked at the house – the joys of 110 years of history – but the dining room has always been the most noticable and disconcerting. My home inspector said it stemmed from a cracked floor joist that must have occured when a previous owner installed ductwork in the basement. The inspector and another contractor concurred that the floor isn’t sinking – it’s moved as far as it will – but it’s always been a bit unsettling. Regardless, I plan on ripping up the otherwise nice hardwood floor and pouring a leveling compound, then laying a new subfloor and some sort of flooring. I may also replace the support beams in the basement to make them all uniform and get rid of the potentially-scary shims.

Driveway Lessons

Tuesday morning, common sense prevailed and I went out and bought more crack filler to do the job right. I could definitely see the difference between the cracks I filled properly and the ones that only got the liquid/spoiled sealant treatment. My dad’s voice echoed in my head: “If it’s worth doing, it’s worth doing it right.” Or, the adult version that he starting preaching when I hit college: “Don’t do a half-assed job.”

So I sealed the remaining cracks thoroughly and made sure that everything was nice and solid before leaving it to set overnight. (And then we took a road trip to Aurora for dessert at the new Sonic – and discovered a TWO HOUR WAIT that filled several nearby parking lots. It’s fast food, people! Needless to say, we didn’t wait.)

Originally, I had naively planned to do the whole driveway process myself, including the sealcoating. After all, my dad has always done the family driveway by himself, and it’s twice as big as mine. But since Don had Wednesday off, we decided to knock it out together and (theoretically) get done twice as quickly.

Ha! Needless to say, it took much longer than we anticipated, and it took awhile to really understand the tips Dad had given us. For example, he recommended misting the section of driveway first to make it easier to spread the goop. However, working mid-day on a hot, sunny day, we were breaking off bigger sections than we could handle, and the sun was evaporating our thin coating of water before we finished the area.

Other lessons we learned:

1) Sweeping is really really important. In the future, we’ll do a heavy-duty driveway cleaning the day before rather than the sweep-as-we-go the day of. We did a pretty good job scooping up all the stray leaves and twigs, but I didn’t realize just how much dust and general dirt had gathered along the edges. Heck, powerwashing may be in order.

2) Edging with an old paintbrush was pretty effective and important, especially up along the house. I discovered that previous owners hadn’t edged all the way up to the grass line in the yard.

3) After struggling all morning with the crappy old broom we had designated for the assignment, I discovered an older, crappier broom in the closet and brought it out to help after I finished sweeping and edging. This “midget broom” (so dubbed since half the handle was missing, hence its banishment) had much softer bristles and proved infinitely easier to work with and spread evenly. The softer bristles didn’t hold the sealant as well, so they were more effective for spreading. The sealant really stuck to the coarser bristles, making it tough to spread.

4) The squeegee was useless. My dad had recommended a broom, and the pail said either a broom or a squeegee would do the trick. We figured we could reuse the squeegee for any future basement-water issues, but it really didn’t do much for the driveway.

5) Rather than hoisting (and pouring from) the big 5-gallon pail, we used an old cool-whip container to scoop out a smaller, more manageable amount.

6) The water helped greatly, once we figured out to work with sections about 8 ft by 8 ft at a time (using the fenceposts as a guide). But we had to be careful not to overwater, especially in some of the lower areas of the driveway prone to standing water – actually, this was the one area we found the squeegee useful!

7) Make sure you leave an open entry path back to the house. Fortunately, as we were closing in on the back door, we realized this could be an issue, so we unlocked the front door.

8) Barricading the end of the driveway is not enough, at least on our block! Not ten minutes after “finishing” for the day and roping off the end of the driveway with garbage cans, the kids next door came tearing across the driveway at top speed. (They live on one side; their grandparents live on the other side of us. Both parents and grandparents constantly admonish them to use the sidewalk rather than our yard, but kids will be kids. Ack, the inner curmudgeon awakens!)

The end of the driveway looks better than the first sections we did, as we figured out the better way to do things. We may go back and touch up some of those areas since we still have some sealant. Either way, it looks infinitely better and about 8 shades blacker than before.

Now I just need to touch up the foundation where I splattered a bit… luckily, since the fence project is looming, I can ignore the flecks there!

Did you know…

…that spackle molds?

I sure didn’t, until I opened up a half-empty tub of spackle to do a tiny bit of patchwork and discovered three different types of mold! I had an assortment of gray fuzz, orange splotches and black dots. I suppose since there’s some water in spackle, and it’s been humid, the little plastic tub provided the perfect breeding grounds for mold.

Fortunately, I had some wood putty (without fungus!) handy that did the trick, and the trimwork around the new back door is one step closer to completion.

Project week!

I’m taking a week off before I pull my commuter shoes back out of the closet (long story to be detailed soon). Taking advantage of the time off in the waning days of summer, I developed quite a list of projects I want to tackle. Some of them are ambitious – like sealing the driveway and “figuring out” (and hopefully ordering) my new fence and a pair of living room windows. I’ve also got some softballs padding the list to fuel a sense of accomplishment, like getting my oil changed and updating my IPASS account information.

This morning, I set off on my first big task: filling the driveway cracks so I can seal it tomorrow. Luckily, this week is blessed by good weather, so I can knock this one out early. But first, I realized I needed to do something about the pretty, wild grasses (read: weeds) along the edge of the driveway where it meets the fence. While I try to quash the dandelions as they rear their ugly heads, I’ve been more lax about the grasses, as they actually don’t look bad and add a bit of color. However, they do some damage to the driveway edge, where their roots try to break through the surface, so they had to go so I could seal the cracks. In the blazing sunshine (pretty! I thought as I headed outside), I donned my gardening gloves, grabbed a yardwaste bag, and set to it.

Ninety minutes later, sweaty, itchy and covered by burrs, I had to call it quits for awhile to run some errands and escape the growing heat. I discovered that the nice, tranquil grasses were actually topped by prickly burrs that clung to my gloves, clothes and hair. And apparently I was allergic to one of the plants, as red and pink bumps erupted along my arms, though cold water stopped the itching and calmed the bumps.

A couple hours later – when the sun had dipped behind the house – I returned and dug out a couple remaining dandelion roots and swept out the cracks due to be filled. I had bought a jug of crack filler last summer but never actually got around to using it (witness the frost heave). LESSON LEARNED: crack filler does not keep through numerous Chicago freeze-thaw cycles. I shook the jug for several minutes (great workout!), it was still completely separated into liquid and solid. I tried pouring it into the cracks, but only the liquid actually left the jug, but I figured it was better than nothing, so I kept pouring as much as I could. Eventually, however, I realized it wasn’t worth doing a half-assed job, so I went back in the house and pulled out some nasty asphalt-in-a-tube I had leftover from the door project. It definitely did the goopy, stinky trick.

LESSON LEARNED: on a driveway that slopes (hey, that’s mine!), there are more cracks at the bottom of the slope. Start there when filling cracks to ensure you don’t run out of goop on the big, long, deep cracks. The smaller hairline cracks should be fine with the liquid leftovers.

I also discovered that even though I missed my bike ride today, weeding and driveway work are quite effective workouts.

Tomorrow, to seal! And replace the broken beadboard in the porch. And, and, and…

The Sistine Porch

I had about two thirds of a tube of caulk left after I finished the last of the door sealing yesterday. It was the first time I had used this particular brand, which meant that after I snipped the top and loaded it into the gun, I struggled and tried to get the goop flowing, to no avail. Instead, I ended up rupturing the bottom of it, not realizing that this brand also has an internal foil seal to break. Oops. Regardless, the result was that I couldn’t just plug the top and save the rest for a rainy day. Rather, I had to use it or lose it.

Since I’ve had a couple minor (and one major) leaks in the porch ceiling this summer, I’ve been meaning to replace a couple rotten boards and seal the gaps in the whole ceiling. I took the leftover caulk as the perfect opportunity to start sealing some of the gaps between the beadboard. Up on my ladder, I could reach things just fine, but I found myself realizing that Michelangelo was on to something when he lay on his back to paint the Sistine Chapel. In the hour or so that I was working, I did maybe a fifth of the porch ceiling, since I had to keep moving the ladder. At moments I would reach too far directly behind my head and momentarily feel a bit dizzy. Eek.

But I didn’t realize the true extent of my work until this morning, when I woke up with aching triceps. Who knew that caulking the ceiling would be such a great workout? I’ve got least four or five more workouts ahead of me before winter sets in.

Foiled by Gravity

I had a very productive weekend! I spent yesterday doing all kinds of door-related work. I applied the first coat of stain to the trim, finished caulking all the way around the outside and inside of the door, and played with the nastiest stuff I’ve ever worked with – asphalt/tar caulk, filling the gap between the driveway and the doorframe. (The driveway is, of course, unlevel.)

I did all this while eying the clouds as they built and waned. I did all my staining out in the driveway – avoiding the fumes that would build in the basement and the darkness of the garage –
but had everything on a sheet, ready to drag into the garage at the first raindrops. I got lucky, and the sun even came out.

Then I came inside and set off to fill the big, hollow void that I discovered last week. On Dad’s advice, I had bought some Great Stuff, and had happily picked the “Big Gap” variety. I donned my goggles and my one remaining rubber glove (the other having fallen victim to the gross tar gunk), climbed my step stool, and poised to start at the top and work my way down. I quickly realized that gravity had other ideas, as everything I filled plopped its way down the shaft to the bottom. Working quickly, I climbed down and started working from the bottom up, purposely only filling about half the gap, per the instructions.

My big can of Big Gap Great Stuff only filled about half the void, so resigned, I pushed the stuff into place and packed up for the afternoon.

Two hours later, I passed through the back hallway and stopped cold. The Great Stuff had settled down from where I had originally put it. Gravity had intervened, pulling the whole mass downwards into a big blob. I tried to push it back up, but it was still sticky and malleable and I was afraid of making it worse, so I left it to solidify, hoping I could carve it up and reuse the misplaced foam. (I had used Great Stuff before to fill in some (horizontal) gaps in the basement and found it easy to work with – and once it hardens, easy to carve off the excess with a knife. Gravity hadn’t been a factor when working horizontally.)

By morning, an entire digestive system of foam adorned my wall. After a busy day (laundry, weeding, more staining, and Elgin’s Greekfest), I decided to tackle the stomach-shaped mass. I set off with a razor blade, but found a screwdriver more useful. I hacked into the stomach, chiseling off small chunks – like packing peanuts, but without the candy colors. In a way, they worked out better than the original foam, since I could easily stuff them back around in the corners of the void, whereas working with aerosol, you just point and hope. I filled a pretty good portion of the hole with the leftovers, taking off a couple chunks of paint in the process. (Fortunately, in my garage diggings yesterday, I found a third of a gallon of paint labeled “Back Entry.” It perfectly matches the paint already on the walls, which we feared we would have to repaint entirely to compensate for the slightly-smaller trim and a bit of damage (i.e. the hole we made while prying off the old trim).

One small can of Great Stuff should fill the rest of the void – and no, I won’t be getting the “Big Gap” variety again! Plus, I’ve learned that when working in vertical spaces, it may help to prop up the fresh foam while it solidifies – I’m thinking a piece of cardboard may do the trick.

Regardless, I’m closer to finishing the door project once and for all! Then I move onto the fence…

My house is hollow!

Don and I made a trip to pick up all the remaining pieces for the door: more caulk, more asphalt/tar/goop for the seal between the door and the driveway, lumber to rebuild the trim, paint for the door and other miscellaneous stuff.

The old trim was in really bad shape. Bits of it had obviously been replaced over time, leading to an inconsistent and ugly mismash of wood types and stain shades. We measured the pieces we would need, then started to rip out the old stuff. The first bit came off easily – after we got through the four nails at the top, the rest was glued to the wall with liquid nails. Lazy. Then, strangely, we discovered two inches between the end of the drywall and the new door frame that had been filled in with wood. Apparently, the original door had been the standard 32″ width, and some previous owner had built up the frame to suit a 30″ door. It makes no sense whatsoever – why replace a standard door with an extra narrow one? Maybe he had an old 30″ one lying around? Regardless, even if I had known about the gap before ordering the door, I would have strongly hesitated going with a 32″ door, since it would have entailed cutting into the aluminum siding on the other side.

Dimensions and list in hand, we asked for help in the lumber aisle at Home Depot. While Don picked through the 2x4s to find the straightest ones possible, the HD guy and I sought a sufficiently wide – and sturdy – piece to level out the new threshold with the existing cement steps. I said I was looking for a nice, thick piece of pressure-treated wood, but the HD guy kept trying to sell me some fancy, decorative piece. Finally, we found the millwork “expert” who suggested – what else – a thick piece of pressure-treated wood. They didn’t stock the width I needed, but they did have some a half inch wider. Sold. The HD guy proceeded to explain to me how I should measure the piece to the right width and – using a straight edge, dontcha know – mark the width, then sand it down. I agree that sanding is the way to go, and thanked him for his help. Then, upon returning to Don’s pile of 2x4s, the HD guy proceeded to repeat the recommendations for measuring, marking and sanding. Nevermind that he had just explained the exact same thing, 10 feet down the aisle, to me. Don was astounded by the guy’s demeanor – as if I was just the clueless helper on the project, and not the instigator! I told him that this happens ALL THE TIME with HD and Lowes associates. But alas.

This afternoon, Don beat me home and started ripping out the rest of the trim. He made an interesting discovery – in the small, narrow space between the door frame and the corner of the house, the house is HOLLOW. No drywall, no insulation, nada. Just empty space, the framing of the house and a whole bunch of ants. So now we need to figure out what to do there. Is it worth drywalling a space that’s only 2″ wide? Either way, we’re going to seal the heck out of it and insulate it in some way, shape or form. Upon closer inspection, we discovered a small gap between the foundation and the siding – that’s gotta be the entry point for the ants.

Much more to do, but progress is being made. And already, I feel so much more secure with a door that closes and locks firmly.

Door day!

At last, the doors went in yesterday. Dad and Mom showed up bright and early (too early for my Friday-national holiday taste, but I understood their rationale for a 9 AM arrival), bearing tools and birthday cake. After we had our breakfast cake, we settled into work.

Demolition went pretty quickly. The old door popped out easily, though we discovered that much of the jamb was held in place with approximately 27 coast of paint. Dad commented how heavy the old wood door, especially compared to its steel replacement. We also discovered quite the nest of ants, burrowed into the door frame, so we sprayed heavily. We parked the old doors in the garage, since my sister may want to repurpose them for a house she’s fixing up. As she said, an old crappy door is better than no door at all. And the price is right.

Then the fun began. Dad and Don kept setting the new door into place to see where it fit and where it was too tight. After lots of back and forth (literally), we were close, but it still wasn’t fitting quite level. So Mom, Dad and I took off for Home Depot while Don stayed behind to guard the house (since there was a gaping hole in the side of it) and sand through the 27 layers of paint that were impeding the fit process.

While we were at the Depot, Don called with a realization – the door wasn’t fitting because the hinge screws in the pre-hung door weren’t screwed down. Since they were protruding, of course the door wasn’t fitting quite right. We got the rest of the supplies we needed – caulk, screws, tar paper, and other stuff – and headed home.

The rest of the installation was slow and steady, but other than a quick trip to Ace to pick up a hacksaw (new tool acquired! Who knew that storm doors are sold with stock size bars that have to be cut to fit the opening?), we made good progress. Late in the process, we were all tired and hungry and hot in the sun, so we pulled out the patio chairs, but the end result is divine.

We ran out of caulk – the gaps between the house and the door frame are pretty significant – and the trim still has to be ripped out and replaced, but the door opens perfectly level, closes firmly but easily and the storm door actually fits the gap. Perfection. With just a bit more work , I’ll have a door that will last for years – and hopefully prove much more energy efficient than the old one.

Busy, and Thwarted by the Weather

Since starting the new job, I’ve been a tad busy learning everything I can about the new industry and adjusting to the new lifestyle. Plus, since I’m getting home earlier, I’ve been going on as many evening bike rides as possible. (The bike path itself has been fascinating with the ongoing heavy rains – there are places the path is closed entirely due to flooding, and many others where the river water laps up along the edges.)

My fancy new back doors came in a few weeks ago, and after frantic scheduling, my sister came down with her truck and helped me bring them to the house. (It’s cheaper to bribe her with lunch than pay the Depot $59 for delivery!) The doors have been parked in the garage ever since, forcing a very cautious maneuver every time I pull the car in – which is daily now. Every time my dad and I have aligned schedules (thrice, so far), it has rained on our parade. And not gentle-we-can-work-in-this rain. No, we’re talking monsoons. The kind that you can’t even consider working outside in, especially since there will be a gaping hole in the house for a couple (few?) hours. But cross your fingers for Friday…

Meanwhile, all the rain has been great for the living things in my yard! My tomato plant boasts the first few green tomatoes beginning to ripen, and some of the herbs are doing well. In the front flower beds, I did indeed wait too long to plant the zinnia bounty, but they’re starting to grow. Note to self: start them much, much earlier next year – like early May, or even inside in April. The nasturtiums are growing, but no blooms yet.

And in the back yard, the mulberries have taken over. Everything is purple and goopy and gross, and there’s a nice, rancid odor of ranting berries. The poor garage roof is purple, and the squirrels and birds are in heaven. We cut that tree back so far last fall, but it grows like a weed!

The rain has also once again meant a bit of very minor flooding in the basement, reminding me of the urgency of fixing it once and for all. Perhaps that’s a good rainy day project.

Onwards and upwards. Plenty more to do.