Tag Archives: Driveway

Spring-ization

We have winterization in our lexicon, but not the springtime equivalent. Regardless, that’s how I spent part of my Saturday.

I had four more windows replaced a couple weeks ago (both bathrooms, guest room and upstairs hallway – the latter used to funnel cold air directly into my bedroom), so I had no storm windows to put away this year. Now, I’ve replaced all the windows in the living areas of the house. All that remain are the back hallway, basement and front porch, none of which are a huge priority.

Tulips! And daffodils!

I also cleaned out a winter’s worth of detritus from my flower beds and backyard. I filled an entire yard bag with dead leaves and other junk, and was thrilled to find stuff already sprouting underneath. In the front beds, I had seen tulips beginning to grow, but after removing the leaves, I found daffodil sprouts, too. Along the back fence, I found the early shoots that will become June’s tiger lilies.

Inside, I drained and cleaned the humidifiers, and now they’re air drying until I store them for the summer. I dusted and organized.

Still to do:

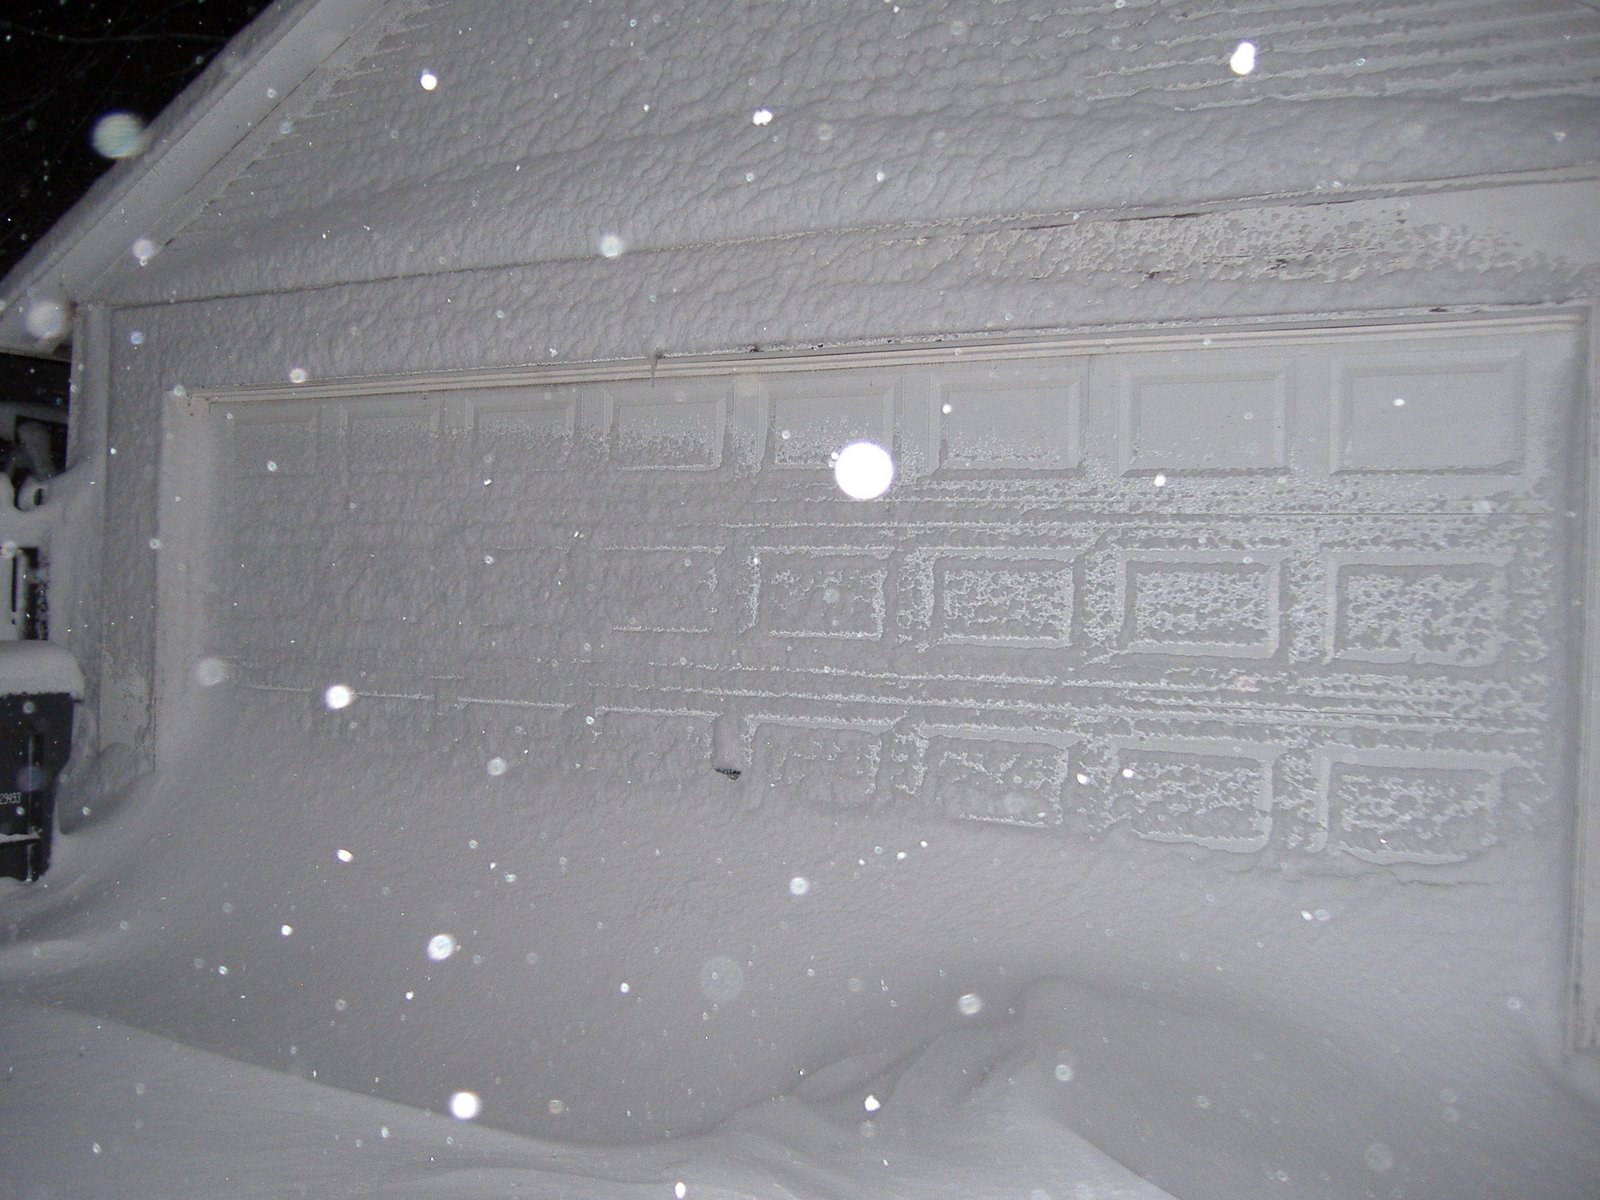
The missing piece was finally found in the backyard once the snow melted.

Fix the soffit that the blizzard tore off the side of the garage. Though it’s not very high, it requires a ladder, and thus I won’t tackle this quick fix unless I have someone spot me. Especially at the back of the house, I’m wary of doing anything where I could fall and no one would notice.

Close, but not quite latchable

Fix the frost heave/front gate situation. A couple years ago, a frost heave appeared in the middle of my driveway. As soon as the weather warmed, it collapsed back into itself, enabling me to seal it and move on. A couple weeks ago, when I first tried to close the gates, I couldn’t get the gate over the heave. Now, it’s collapsed, so I can close the gates, but they’re misaligned so they don’t meet in the middle and latch. I’m weighing my options: raise up the gates (oh-so-heavy and cumbersome; would require a second and potentially third set of hands) and install new hinges, sand off the bottom of the gate that currently rests on the ground, or just leave hope that the warm weather adjusts the driveway a bit more.

Put away the boots and clean, clean, clean. I’m afraid that putting away my winter boots right now might tempt fate, so I’ll hold off at least another week on this one. I also need to pull out the hose, turn on the water and get ready to plant.

And I can’t wait to drag the patio furniture out for the year.

What do you have to do for spring?

Advertisement

I thought I was done with tar…

I spent nearly three hours this afternoon sitting on the driveway by the back door, trying to remove the tar that had splattered up onto the new storm door during our paving project. We had realized – too late, obviously – that we should drape a tarp over the door to ensure the splatter didn’t mar the pretty new door.

Since then, I’ve repainted the foundation to cover the splatters along the driveway. We tried a couple different products to remove the tar from the siding and back door, gingerly testing inconspicuous areas. One removed the finish from the aluminum siding entirely, exposing shiny metal!

Today, I finally decided to give it some real elbow grease. I grabbed the one that didn’t hurt the siding – a Turtle Wax bug and tar remover – and doused a couple square inches of the bottom of the door, then waited 10 minutes instead of the suggested one. Sponge in hand and fingers crossed, I rubbed until the tar bubbles began to give way. Hooray! It was a slow and tedious process, but I’ve done all that I believe is possible. A couple places now sport small yellow spots, but the paint will camouflage that. (We were planning to paint as part of the door project – once EVERYTHING was done – but didn’t want to just paint over the tar bumps.)

I also discovered late in the game that a toothbrush was much more effective than a sponge, which could have saved some thumb strain. But the effort was well worth it.

Painting

It’s been a busy few weeks!

I’ve been painting a ton. It started with the paint around the back door. But then, since I had the brushes, tarp and other fun tools out, I took on other painting projects.

Then, flipping through the pile of paint cans in the garage I tackled other projects. I also discovered that freeze/thaw cycles are not kind to paint. The previous owner had left a dozen or so paint cans in the garage, all labeled with the room they coated. Great, I thought when I found then can labeled, “Back hall.” By its weight, it felt about a quarter full – more than enough to touch up around the new back door where we had removed the trim. I patched everything, sanded it down, changed into painting clothes, set up my tarp and ladder, pried off the lid – and discovered jell-o. The paint had congealed into a layer of gelatinous goo, topped by clear liquid. Interesting stuff.

Luckily, since the Ace Hardware label was still intact with the color name and pigment ratios, I took the can over to my local store. First, I asked them if they could shake it up and see if it was salvageable. It wasn’t. Next, I asked for a quart, assuming I have enough unused paint hanging around the house, and wondering how many of the other cans were worthless. However, in the five years since the paint had been originally mixed, they had discontinued selling the base in quart-sized containers, so I was stuck with a gallon if I wanted the color. That was fine until I discovered that my gallon of premium paint was a whopping $43! Eegads! I’ve never paid more than $22 or $23 for a gallon of paint, and often buy it when it’s on sale. The cashier saw the look of shock on my face and threw in a couple extra stir sticks, but sheesh. Had I know, I would have found a “close enough” color or just resolved to repaint the entire back hallway, complete with 16 foot ceilings where the basement opens up to the rest of the house. Instead, since it’s a nice neutral color, I’ll be repainting some other room – maybe the dining room or office? Either way, since I had plenty, I ended up painting two nice coats around the door and also freshening a lot of the space.

Moving along, I finally (after two years!) painted the second coat in the downstairs bathroom, bringing out the true color I had imagined – a subtle lilac that contrasts nicely against bright white trim and the light green kitchen. I also applied a second coat to the trim and touched up a couple places that had chipped on the kitchen trim.

Next, I did a bit of concrete patching on the front steps before applying a fresh coat of paint. The front steps were tough only because of our continuing brown bug problem. After washing off all the bug carcasses before I started, they kept landing in the wet paint! I kept having to retouch the slightly tacky paint, trying to remove the bodies before they dried, like mosquitoes in amber. There are a couple that I didn’t manage to extract, but they’ll remain entombed as a memorial to their brothers – I’ve killed hundreds this summer.

Meanwhile, our driveway project taught us some valuable lessons – namely, that asphalt is nasty stuff that does NOT come off of concrete or aluminum side. We had been careful applying it, but some had inevitably splattered in the process. So I repainted the foundation facing the driveway (and think I’ll do the rest of the house soon, just to keep it even). However, despite trying two different products suggested by the Home Depot and Ace experts, we cannot figure out how to get the splatters of (black) tar off the (white) aluminum siding without also removing the coating (is it paint?). Especially since I redid the foundation, it looks especially bad. One product yellowed the siding, the other removed the paint-like coating, exposing bare metal. I think for now, our best bet is going to be touching up with white metal paint?

In the midst of asphalt cleanup, I also decided it was high time to repaint our white gate that closes across the driveway. It had a rough winter and a couple bare patches. Luckily, there was another paint can in the garage labeled “gate.” I opened it up and discovered more goo! Sigh. Then I opened an indoor/outdoor paint in another shade of white and discovered pure jelly. My last option – without buying more paint – was to use the same white paint I’ve used for the bathroom and kitchen trim. It’s labeled for interior, so I only did half the gate for now. I’ll let it get through a couple rain storms (it’s rained all day) to see how it holds up before doing the other half. Fence painting sucks – the slats take forever to coat evenly.

I think that’s all the painting for now. I rather enjoy it for the first couple hours, but it gets tedious – and leaves me with a clawed right hand for a day or so afterwards. But it’s one of the easiest and most cost-effective improvements – and you see the results right away.

Driveway Lessons

Tuesday morning, common sense prevailed and I went out and bought more crack filler to do the job right. I could definitely see the difference between the cracks I filled properly and the ones that only got the liquid/spoiled sealant treatment. My dad’s voice echoed in my head: “If it’s worth doing, it’s worth doing it right.” Or, the adult version that he starting preaching when I hit college: “Don’t do a half-assed job.”

So I sealed the remaining cracks thoroughly and made sure that everything was nice and solid before leaving it to set overnight. (And then we took a road trip to Aurora for dessert at the new Sonic – and discovered a TWO HOUR WAIT that filled several nearby parking lots. It’s fast food, people! Needless to say, we didn’t wait.)

Originally, I had naively planned to do the whole driveway process myself, including the sealcoating. After all, my dad has always done the family driveway by himself, and it’s twice as big as mine. But since Don had Wednesday off, we decided to knock it out together and (theoretically) get done twice as quickly.

Ha! Needless to say, it took much longer than we anticipated, and it took awhile to really understand the tips Dad had given us. For example, he recommended misting the section of driveway first to make it easier to spread the goop. However, working mid-day on a hot, sunny day, we were breaking off bigger sections than we could handle, and the sun was evaporating our thin coating of water before we finished the area.

Other lessons we learned:

1) Sweeping is really really important. In the future, we’ll do a heavy-duty driveway cleaning the day before rather than the sweep-as-we-go the day of. We did a pretty good job scooping up all the stray leaves and twigs, but I didn’t realize just how much dust and general dirt had gathered along the edges. Heck, powerwashing may be in order.

2) Edging with an old paintbrush was pretty effective and important, especially up along the house. I discovered that previous owners hadn’t edged all the way up to the grass line in the yard.

3) After struggling all morning with the crappy old broom we had designated for the assignment, I discovered an older, crappier broom in the closet and brought it out to help after I finished sweeping and edging. This “midget broom” (so dubbed since half the handle was missing, hence its banishment) had much softer bristles and proved infinitely easier to work with and spread evenly. The softer bristles didn’t hold the sealant as well, so they were more effective for spreading. The sealant really stuck to the coarser bristles, making it tough to spread.

4) The squeegee was useless. My dad had recommended a broom, and the pail said either a broom or a squeegee would do the trick. We figured we could reuse the squeegee for any future basement-water issues, but it really didn’t do much for the driveway.

5) Rather than hoisting (and pouring from) the big 5-gallon pail, we used an old cool-whip container to scoop out a smaller, more manageable amount.

6) The water helped greatly, once we figured out to work with sections about 8 ft by 8 ft at a time (using the fenceposts as a guide). But we had to be careful not to overwater, especially in some of the lower areas of the driveway prone to standing water – actually, this was the one area we found the squeegee useful!

7) Make sure you leave an open entry path back to the house. Fortunately, as we were closing in on the back door, we realized this could be an issue, so we unlocked the front door.

8) Barricading the end of the driveway is not enough, at least on our block! Not ten minutes after “finishing” for the day and roping off the end of the driveway with garbage cans, the kids next door came tearing across the driveway at top speed. (They live on one side; their grandparents live on the other side of us. Both parents and grandparents constantly admonish them to use the sidewalk rather than our yard, but kids will be kids. Ack, the inner curmudgeon awakens!)

The end of the driveway looks better than the first sections we did, as we figured out the better way to do things. We may go back and touch up some of those areas since we still have some sealant. Either way, it looks infinitely better and about 8 shades blacker than before.

Now I just need to touch up the foundation where I splattered a bit… luckily, since the fence project is looming, I can ignore the flecks there!

Project week!

I’m taking a week off before I pull my commuter shoes back out of the closet (long story to be detailed soon). Taking advantage of the time off in the waning days of summer, I developed quite a list of projects I want to tackle. Some of them are ambitious – like sealing the driveway and “figuring out” (and hopefully ordering) my new fence and a pair of living room windows. I’ve also got some softballs padding the list to fuel a sense of accomplishment, like getting my oil changed and updating my IPASS account information.

This morning, I set off on my first big task: filling the driveway cracks so I can seal it tomorrow. Luckily, this week is blessed by good weather, so I can knock this one out early. But first, I realized I needed to do something about the pretty, wild grasses (read: weeds) along the edge of the driveway where it meets the fence. While I try to quash the dandelions as they rear their ugly heads, I’ve been more lax about the grasses, as they actually don’t look bad and add a bit of color. However, they do some damage to the driveway edge, where their roots try to break through the surface, so they had to go so I could seal the cracks. In the blazing sunshine (pretty! I thought as I headed outside), I donned my gardening gloves, grabbed a yardwaste bag, and set to it.

Ninety minutes later, sweaty, itchy and covered by burrs, I had to call it quits for awhile to run some errands and escape the growing heat. I discovered that the nice, tranquil grasses were actually topped by prickly burrs that clung to my gloves, clothes and hair. And apparently I was allergic to one of the plants, as red and pink bumps erupted along my arms, though cold water stopped the itching and calmed the bumps.

A couple hours later – when the sun had dipped behind the house – I returned and dug out a couple remaining dandelion roots and swept out the cracks due to be filled. I had bought a jug of crack filler last summer but never actually got around to using it (witness the frost heave). LESSON LEARNED: crack filler does not keep through numerous Chicago freeze-thaw cycles. I shook the jug for several minutes (great workout!), it was still completely separated into liquid and solid. I tried pouring it into the cracks, but only the liquid actually left the jug, but I figured it was better than nothing, so I kept pouring as much as I could. Eventually, however, I realized it wasn’t worth doing a half-assed job, so I went back in the house and pulled out some nasty asphalt-in-a-tube I had leftover from the door project. It definitely did the goopy, stinky trick.

LESSON LEARNED: on a driveway that slopes (hey, that’s mine!), there are more cracks at the bottom of the slope. Start there when filling cracks to ensure you don’t run out of goop on the big, long, deep cracks. The smaller hairline cracks should be fine with the liquid leftovers.

I also discovered that even though I missed my bike ride today, weeding and driveway work are quite effective workouts.

Tomorrow, to seal! And replace the broken beadboard in the porch. And, and, and…

More fun than a frost heave

I had a frost heave appear on/in/under my driveway last March. It mostly settled itself – the driveway shrunk back down nearly to its normal height once spring settled in. And I swear I’ll actually seal the crack(s) once and for all during the upcoming (now weather-pending) Crack Weekend.

One of my favorite bloggers, National Review’s John Derbyshire, apparently has a similar problem, though the timing suggests something other than a frost heave. His inquiry for ideas lead to a bevy of possibilities, including subterranean mushrooms, an old well, dandelions (a problem I’ve had – they do push through asphalt!), a volcano, a baby driveway (i.e., sidewalk) and more. Possible solutions range from fungicide to shotguns. All of which are far more interesting than my problem and (lack of) solution.

They’re Ba-ack!

Perhaps they were never really gone. After a couple months of relative quiet, the crack dealers across the street have returned. During the half hour it took me to mow my front lawn Sunday afternoon, I witnessed four drug deals. As is often the case, within about 2 minutes of calling the police, the dealers cut and run, scattering like cockroaches.

In honor of their return, I am declaring next weekend “Crack Weekend.” I will fill in all the cracks in the driveway, sidewalk and the foundation. Maybe I’ll even paint the front steps while I’m at it – and wave at the crack dealers across the way. Weather permitting, of course.

Meanwhile, the local smoke shop – really, more paraphernalia than tobacco – has acquiesced in their fight against our neighborhood association and is leaving town. The shop was just around the corner and lacked parking, so I often had patrons parking in front of my house. Good riddance!


Garbage Games

Living in the city, trash day was never really a factor. When the kitchen can was full, I took it out to the alley dumpster which was emptied twice a week by magic trucks.

But in the suburbs, we have Trash Day. Every Tuesday night, I make the trip through the house, emptying the cans, and take it all out to the big can, then roll it to the curb. As a single girl, I don’t generate a ton of trash – my recycling bin is actually usually the fuller of the pair – so I can skip a week if time or weather makes the twilight rolling unappealing. This is particularly true in winter, when there’s no smell quotient.

The past two Tuesday nights have been snowy, bitterly cold messes, so while I keep adding to the cans, I haven’t actually rolled them to the curb yet this month. Last night, while waiting for the car to warm up (it was two degrees), I realized it was time. I also realized that the cans were frozen to both the ground and the fence, stuck in a snow bank a good 18 inches deep.

Now the logical thing would have been to do what Kevin pointed out this morning: grab some hot water from inside, poor it over the bank, and move quickly to free the cans. That, or wait for Don to come over. But hindsight is always 20/20.

As bundled up as I was, I wanted to get the task done then and there. So I leaned up against the cans, trying to dislodge them. I pushed, I kicked, I cursed.

And finally, I walked back about 10 feet, got a running start (thank goodness for YakTrax!) and rammed into the recycling bin. Free at last! Once the recycling was free, the garbage had no choice but to follow suit.

Of course, when I got to the end of the sloping, icy driveway, I realized that there really isn’t a curb, but rather a knee-high snow bank, so following the example of my neighbors, I left both cans in the street.

Hopefully, by mid-March, this won’t even be an issue.

Snow aftermath

It’s mostly stopped snowing – just a few pretty flurries daintily floating to the ground – and the winds are dying down.

A couple hours ago, I tried to shovel. After forcing open the back door, I trudged my way to the garage to retrieve the necessary tool. There’s about a foot of snow, though in places it has drifted much higher and spilled over the tops of my boots.

I made it to the garage (an attached garage would be nice, but rare in older homes) and discovered that the snow had drifted so high against it, that the lock was frozen solid. I chipped away at it, tried to open it and grumbled in the quiet night. After a bit of chipping, I was able to get the key in and very gingerly turn it, but the handle itself is frozen in position, and I’m assuming the door itself is frozen to the ground. (I’m very, very careful with that lock because a couple months back, Don broke the spare key in that lock, and I haven’t found a hardware store capable of cutting a replacement for the small, strangely shaped key.)

Yes, there is a side door to the garage, but Don happens to have both copies of that key in his possession. Oops.

Oh, well. It’s a sign that I’m supposed to stay in and enjoy this snowy evening. And besides, Don is always volunteering to help shovel. Well, at this point…